Enable HTTPS in Amazon Beanstalk in Spring Boot application
I am finding it difficult to enable HTTPS in an application on Amazon Beanstalk in single instance.
The application is developed in Java (Spring Boot), with tomcat embedded and for deployment I used the file .jar generated. The application is functional and a domain has already been added. On the http port is working perfectly.
I have requested and a certificate attached to the corresponding domain by amazon console in "Certificate Manager".
By the tutorials it seems to me that when the instance uses load balance Amazon simplifies the use of the generated certificate, however the application is using a single instance, for this case the manuals instruct to enable via configuration files, and it is in this part that I am "stuck".
I tried to follow the following tutorials:
- https://docs.aws.amazon.com/pt_br/elasticbeanstalk/latest/dg/https-singleinstance.html
- https://docs.aws.amazon.com/pt_br/elasticbeanstalk/latest/dg/https-singleinstance-java.html
- https://docs.aws.amazon.com/pt_br/elasticbeanstalk/latest/dg/https-singleinstance-tomcat.html
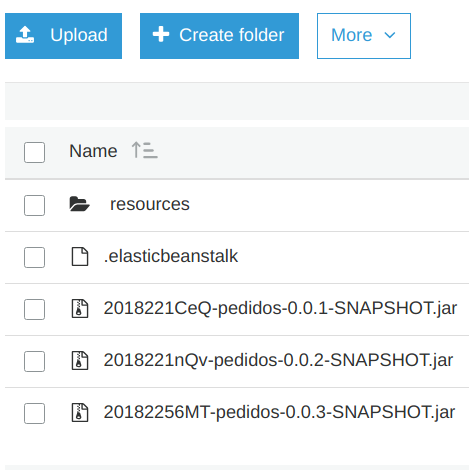
However I do not know exactly if I should create or edit files and directories and where, especially because in the application S3 I have the following architecture.
In short I ask for help to Configure My application to accept receive https requests using the certificate generated on amazon.
Grateful.
2 answers
In fact, it seems that it is not very obvious how to do this with Spring Boot.
However I don't know exactly if I should create or edit files and directories and where, especially because in the application S3 I have the following architecture.
Goes inside the root of the Spring Boot JAR.
It seems that the simplest way to do this is by Maven.
Add the .ebextensions to the root of your project and add the following plugin to the end of the plugins pom.xml of your project:
<plugin>
            <groupId>org.apache.maven.plugins</groupId>
            <artifactId>maven-antrun-plugin</artifactId>
            <version>1.6</version>
            <executions>
                <execution>
                    <id>prepare</id>
                    <phase>package</phase>
                    <configuration>
                        <tasks>
                            <unzip src="${project.build.directory}/${project.build.finalName}.jar" dest="${project.build.directory}/${project.build.finalName}" />
                            <copy todir="${project.build.directory}/${project.build.finalName}/" overwrite="false">
                                <fileset dir="./" includes=".ebextensions/**"/>
                            </copy>
                            <zip compress="false" destfile="${project.build.directory}/${project.build.finalName}.jar" basedir="${project.build.directory}/${project.build.finalName}"/>
                        </tasks>
                    </configuration>
                    <goals>
                        <goal>run</goal>
                    </goals>
                </execution>
            </executions>
        </plugin>
This plugin will use ant to unpack the final Spring Boot JAR, copy the .ebextensions into the root of the jar's contents, and compress the contents into a new JAR with the same name as the original.
After some research and carrying out this procedure manually, follows the step by step to upload a Spring Boot application with https in Elastic Beanstalk of only one instance, just as @DuilioBenjoino said in the comments he managed to carry out the procedure with Load Balance since AWS automates the inclusion of the SSL certificate leaving everything simpler, on the other hand it is a little more complex when we do not have Load Balance.
This description and a compiled from official documentation: https://docs.aws.amazon.com/pt_br/elasticbeanstalk/latest/dg/https-singleinstance-java.html
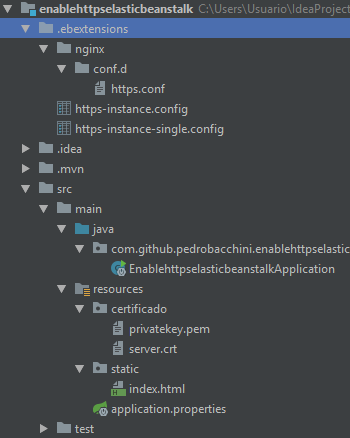
According to the official link to enable https in a Java SE environment that is the case of Spring Boot It is necessary that it be packaged together with bytecode a folder called .ebextensions this folder must have 3 files, are They:
- .ebextensions/https-instance.config
- .ebextensions / https-instance-single.config
- .ebextensions / nginx / conf.d / https.conf
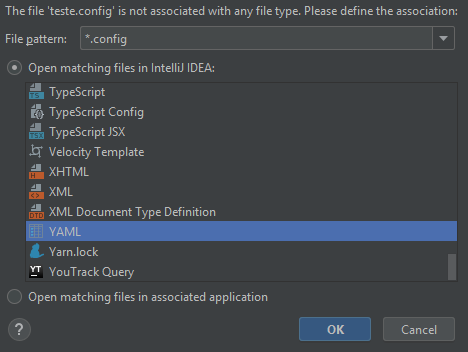
An important observation about the first two files, I had a little difficulty generating them correctly because it is possible to send them in two formats YAML or JSON as the documentation recommends YAML for the fact that it is more readable was this format I chose but I had never used and did not use it I paid attention to the issue of formatting something that is very clear in the documentation and that should be followed for perfect operation, "always use spaces to retreat the keys at different levels of nesting" this means that a text editor should be used that uses spaces to do the file formatting in my case I used Intellij that does this as the default for YAML files.
When creating a new file in Intellij with the extension .config will be asked which editor you want to associate this file, associate with YAML.
Follow the documentation for more information about the configuration files: https://docs.aws.amazon.com/pt_br/elasticbeanstalk/latest/dg/ebextensions.html
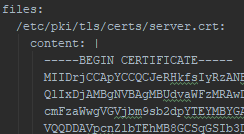
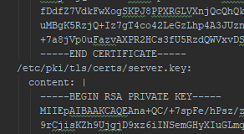
The first file refers to the SSL certificate, its private key, and a command to restart nginx. I will not go into details of the generation of this self-signed certificate because it is well detailed here to end of certificate generation there were two server files.crt and privatekey.pem certificate and Key respectively. Put the contents of the certificate inside content in the /etc/pki/tls/certs/server path.crt and the contents of the key inside content in the path / etc/pki/tls/certs/server.key getting this way: (much attention to the issue of formatting)
The second file is referring to the instance security group as we are configuring a single instance environment this setting and required to add a rule to the group of that instance that serves to enable traffic on Port 443, just copy the code to the file like this in the documentation.
The third file is related to NGINX configuration, this is a reverse proxy that comes by default in the Elastic Beanstalk environment, it has a default configuration but to enable https and necessary to replace it. Just copy the code to the file like this in the documentation replacing the value of app_port with the port number of your application.
With the 3 files created your Spring Boot project should look like this:
The project is ready to be sent to ElasticBeanstalk with https enabled and the default jar that is generated by the Spring boot plugin does not contain the folder .ebextensions, to generate a jar containing this folder is needed just like @Dherik commented in his answer add a new plugin, I did exactly as it put with just a change in the zip tag, destfile property I put at the end of the AWS name to differentiate the Spring boot jar from the specific for AWS.
Destfile="{{project.build.directory} / ${project.build.finalName} - AWS.jar '
Follow the link to the example project created to answer possible questions: https://github.com/pedrobacchini/EnableHTTPSElasticBeanstalk
In relation to using the certificate generated by aws I believe it is necessary to copy the certificate and private key as described for the self-signed certificate and should work normally, I'm not sure because I did not test this case because the self-signed certificate was enough.